Aftermarket Garage
    Facebook Twitter Instagram
    Trending
    • Jaguar Vanden Plas – Fender bender
    • Jaguar X350 (2005 Vanden Plas) Ground Point Failure and Fix
    • Jaguar X350 XJ8 coolant leak
    • 2005 Jaguar XJ8 Vanden Plas Coolant Reservoir
    • 2009 Honda Ridgeline has clock issues with 2022
    • Replacing the cabin filter in a Honda Ridgeline
    • Nissan VH45DE Engine Sound
    • Changing the oil in a 2009 Honda Ridgeline
    Facebook Twitter Tumblr
    Aftermarket Garage
    • Home
    • Maintain
    • Repair
    • Improve
    • Store
      • Top Products
    • Garage
      • BMW
        • 1999 BMW M3 E36
        • E39 BMW M5
      • Honda
        • 2009 Honda Ridgeline RTL
      • Mercedes-Benz
        • 2001 Mercedes-Benz S430
        • 2006 Mercedes-Benz S600 AMG Sport
      • Nissan
        • 1996 Nissan 300ZX 2+2 5 Speed
      • Jaguar
        • 2005 Jaguar XJ8 Vanden Plas
      • Volvo
        • 2001 Volvo S60 2.4t
        • 2001 Volvo S60 T5
    • About
      • Privacy Policy
    Aftermarket Garage
    You are at:Home»Repairs»2001 Volvo S60 T5 raw fuel smell

    2001 Volvo S60 T5 raw fuel smell

    0
    By Jason Kent on June 29, 2015 Repairs

    With summer upon us here in the middle of Oklahoma the afternoon temperatures can get blazing hot. I don’t like to leave cars out in this heat but unfortunately I do not have a 4 car garage or workshop of my dreams at this time so some of the cars usually have to sit outside and currently that honor falls to our 2001 Volvo S60 T5 and the wrecked 2.4t that I am slowly parting out.

    With the forecast calling for near 100 degree temps I decided to start pulling the T5 into the garage before heading to work since that space isn’t used during the day while I’m away. When I returned home from work that first day I noticed the smell of gas when I entered the garage. Since it was a new smell and I had recently replaced the fuel filter on the Volvo I knew it probably was the culprit.  I first checked to make sure there wasn’t anything leaking from around the fuel filter.  I couldn’t see any signs of wetness anywhere and couldn’t really isolate where exactly the smell was coming from.  I decided to take the car to the car wash and pressure wash the undercarriage just in case the smell was caused by any that spilled out on the frame during the filter change.  This seemed to help a little but the next time I parked it in the garage I noticed the smell again, this time I was able to determine that it seemed to be coming from the driver’s side rear instead of the passenger side where the fuel filter is located.

    Products Used

    Scott Multi Purpose Shop Towels

    Optional:
    O-ring for Fuel Sending Unit

    Tools Used

    2 Large Flathead Screwdrivers
    10 mm Socket

    Optional:
    Fluid Transfer Pump
    Fuel Tank Lock Ring Remover

    I was going to give it a week or so to see if it went away on its own but decided now was the time to fix it when a Volvo enthusiast friend of mine noticed the smell when he was running VIDA diagnostics on the car for me.  Raw fuel smell coming from anywhere on your car is nothing to ignore so I did what I usually do when looking into a problem and consulted Google.  This brought me to some forum posts from 7 years ago about various recalls and extended warranties from Volvo but most of these posts dealt with issues with the passenger side (RH) fuel pump housing.  Since the smell seemed to be coming from the driver’s side and it was very easy to get to I decided to start there.

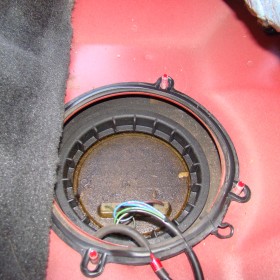
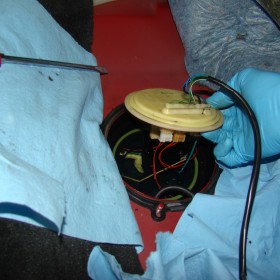
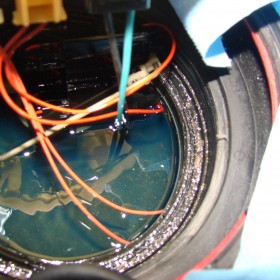
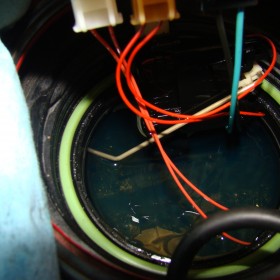
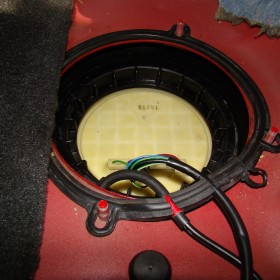
    I removed the rear seat cushion which on the Volvo is about as easy it gets since you just pop it up at the corners on both sides and pull up and out of the car.  There is a plate underneath the padding that houses the fuel level sending unit and as soon as I removed the four 10 mm nuts holding that in place I saw where the problem was.  The top of the unit was damp and smelled of fuel so now I just needed to figure out why.

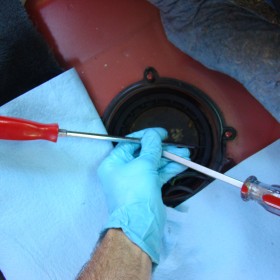
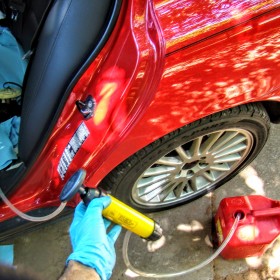
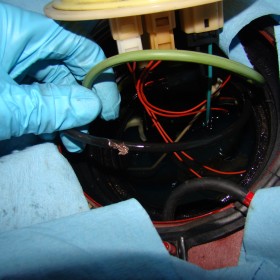
    My friend that I mentioned earlier just happened to show me the trick to removing the fuel filter lock ring without a special tool.  I took 2 long flathead screwdrivers and crossed them over making sure they had a good bite on the ring so that I wouldn’t break any of the teeth off. It took me a while to finally get it to break free and I had to exert a lot more force that I would have liked to on the plastic piece but eventually it came out.  Be careful if you use this method to not let the screwdrivers slip lose and snap a wire off of the sending unit or use them close the edge of the teeth and break one off.  I don’t suppose the lock ring would be useless with a missing tooth but it’s probably best to avoid finding out.  Once I removed the ring the sending unit popped up and fuel started to come out of the top since the tank was pretty full and the car was parked at a slight angle towards the side I was working on.  If I have to do this again I’ll make sure to park it the other way to see if that makes a difference. Hopefully I won’t have to do it again and if so I’ll make sure it has less fuel in it as well.  I ended up using a pump to get the excess gas out of there which worked out well since I needed some for the lawnmower anyway!

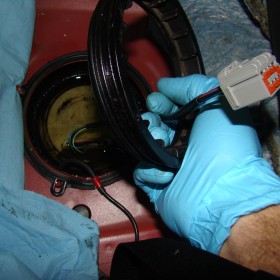
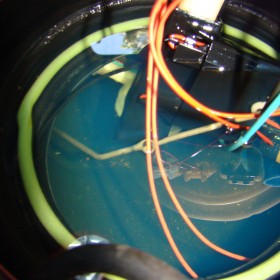
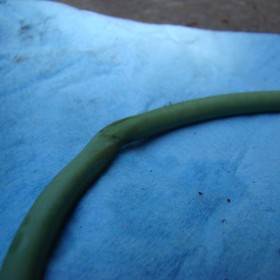
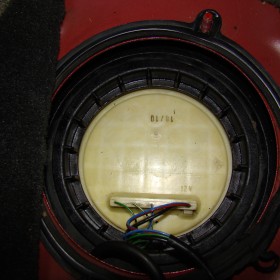
    It was pretty clear once in there what the issue was, apparently this unit has been worked on before and whoever did the work had 2 O-rings in there.  Which explains why the lock ring was on so tight as well as why it was leaking.  I tried to show in some of the pictures how this crimped the sending unit O-ring.  Luckily for me I have an S60 parts car in my driveway so I was able to use an O-ring from it and hopefully the small fuel leak will be a thing of the past.  If not I guess my next step will be to buy a new O-ring and replace it.

    Whoever serviced this before used 2 O-rings here for some reason.
    You can see here the O-ring was crimped pretty good.

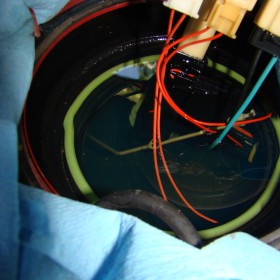
    I’d like to also note that I cleaned up the area where the O-ring would be seated along with the sending unit before putting everything back.  I didn’t want to take a chance of any debris getting in there and compromising that seal but I also just like to clean things while I’m working on them.

    I will be keeping an eye on this for the next few weeks just to make sure the leak and smell is gone.  I also plan on checking the fuel pump side as well just to make sure this same double O-ring situation doesn’t exist over there.

    Last Updated: Oct 29, 2015 @ 9:37 am

    Spread the word

    • Click to share on Facebook (Opens in new window)
    • Click to share on Twitter (Opens in new window)
    • Click to share on Pinterest (Opens in new window)
    • Click to share on Tumblr (Opens in new window)
    • Click to share on Reddit (Opens in new window)

    Related

    Share. Facebook Twitter Pinterest LinkedIn Tumblr Email
    Jason Kent
    • Website

    I am not a professional mechanic (or writer) but I take pride in fixing cars and not only keeping them going but making them better. I have slightly above average skills just like I would expect a lot of people who find this website do. Please follow my advice at your own risk... sometimes I fix things but sometimes I make them worse!

    Related Posts

    Volvo S60 Timing Belt Replacement

    2001 Volvo S60 2.4t Part Out

    Volvo S60 Rotor and Brake Pad Replacement

    Leave a Reply Cancel reply

    Popular Today
    • Incredible 300ZX Z32 Interior Upgrade I ran across this amazing piece of after...
    • Volvo S60 2.4t Throttle Body Cleaning If you are having issues with a rough id...
    • Treating surface rust on your subframe I try to avoid buying cars that have spe...
    • Jaguar XJ8 X350 Center Console Removal I removed the console this weekend to in...
    • Jaguar Vanden Plas – Fender bender A few more years ago than I'd like to ad...
    • Jaguar XJ8 X350 Trunk Liner Removal If you own a Jaguar XJ8 and do your own...
    • Volvo S60 Timing Belt Replacement This is a great how-to video from Jason...
    My Tweets
    Tags
    5 Series 300zx Aftermarket Garage BG 44K BMW brakes Cabin Filter Clock Comfort console coolant Detailing Engine Knock Fram Fuel Additives Fuel Tank Honda improvements Infiniti interior Jaguar leather Lucas Maintenance Nissan Octane Booster Oil Change PCV performance Quick Fixes Ridgeline Rust S60 Side Marker Sound thermostat trim upgrades VH45DE Volvo volvo s60 wheel clearance X350 XJ8 z32
    Popular Posts This Week
    • Jaguar XJ8 X350 Center Co... I removed the console this weekend to investi...
    • Removing calcium deposits... Sometimes the normal routine that you use to...
    • Incredible 300ZX Z32 Inte... I ran across this amazing piece of aftermarke...
    • 2005 Jaguar XJ8 Vanden Pl... PROJECT STATUS: Incomplete - On Hold I've rec...
    • Jaguar XJ8 X350 corroded... One of the first things that I do when I buy...
    • Jaguar Vanden Plas –... A few more years ago than I'd like to admit s...
    Popular Posts this Month
    • Incredible 300ZX Z32 Inte... I ran across this amazing piece of aftermarke...
    • Removing calcium deposits... Sometimes the normal routine that you use to...
    • 2005 Jaguar XJ8 Vanden Pl... PROJECT STATUS: Incomplete - On Hold I've rec...
    • Jaguar XJ8 X350 Center Co... I removed the console this weekend to investi...
    • Treating surface rust on... I try to avoid buying cars that have spent mo...
    • Jaguar XJ8 X350 corroded... One of the first things that I do when I buy...
    Popular Items
    • Schumacher SE-1072 5/10 A... Can charge six 12-volt or twelve 6-volt batte...
    • Bosch 0280160297 Fuel Pre... Corrosion resistant housing material Premium...
    • Schumacher SE-6030 4/30/6... Helps in fleet operations and industrial use ...
    • Schumacher PSW-3060 DSR P... Charges 6 and 12 Volt batteries Starting ampe...
    • Schumacher PSW-61224 DSR... Charges 6, 12 and 24 Volt batteries Starting...
    • Schumacher SS-51A-PE Ship... For onshore charging needs Can be switched to...
    Hot Today
    • Schumacher SS-51A-PE Ship... For onshore charging needs Can be switched to...
    • 2008- MERCEDES SL R230 W2... A brand-new OEM item in its original packagin...
    • Schumacher SE-3000 1.5-20... Includes a specialized single rotary switch w...
    • Schumacher 200/100/40/10/... 100 Amp 6V engine start , 200 Amp 12V engine...
    • Schumacher SE-2151MA Spor... 100A/15A/2A, Sports Power Automatic Battery C...
    • Schumacher SE-2352 2/35/2... Rugged metal case with top handle and wheels ...
    Facebook Twitter Instagram Pinterest YouTube Tumblr
    © 2023 Aftermarket Garage

    Type above and press Enter to search. Press Esc to cancel.