
Regular oil changes are a must for proper engine maintenance and to help extend the life of your vehicle. When I started changing my oil back in the 80s the school of thought was that you should change it every 3 months or 3,000 miles. With the advancement of synthetic oils and engine technology this oil change interval is outdated in most cases. I suppose if you do a lot of stop and go driving in a very hot dusty environment on a daily basis then you should change your oil every 3,000 miles but for most of us it is not necessary.
Honda recommends oil changes every 3,750 miles for the Ridgeline but that is if you drive less than 5 mile trips on a regular basis. I try to change the oil every 6-7 months or every 6,000-7,000 miles. Even at that interval the “Oil Life” indicator is usually around 30% when I change it.
- Products Used
- Tools Used
Products Used
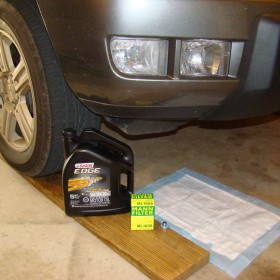
5 quarts 5w-20 Synthetic Motor Oil (4.5 quart capacity)
Optional:
Tools Used
I recently changed the oil in our Honda Ridgeline, it has about 92,000 miles on it now and is still going strong. I tried to document the process with pictures but as usual I didn’t take some pics that might have helped. I think I’m going to invest in a good video camera and make videos so that I can screenshot whatever photo I need. For now though here is a quick write-up of the process.
Changing the oil in this truck is about the same as any other car; drain old oil, replace filter and plug, fill with new oil. One benefit of changing oil in a vehicle that sits higher off of the ground is that you don’t really need to put it up on ramps. I usually do anyway just so that the oil pan is at an angle to help it drain better but this time I had another car up on the ramps so I just pulled the truck up on a couple of boards to get at least a bit of elevation.
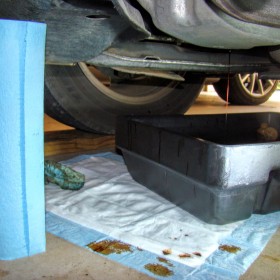
After letting the truck warm up to bring up the oil temperature for better draining I put the oil drain pan under where the oil plug is along with an absorbent pad for the seemingly unavoidable oil splash that occurs. I have several medical pads left over from when I used to need them and they’ve come in handy through the years for situations like this.
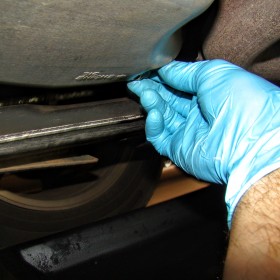
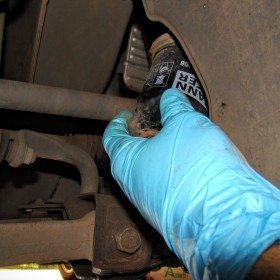
To remove the oil drain plug I used a 17mm socket to break it free and then unscrewed it the rest of the way with my hand. It’s probably considered more manly if I do it without the rubber gloves but I am a huge glove fan and wear gloves for most anything I do that could involve my hands getting dirty. Once the drain plug is out I also remove the oil fill cap and clean it off with a shop towel. I’m usually in no hurry when I’m changing the oil so I like to let it drain for at least 30 minutes just to get as much of the old oil out as possible.
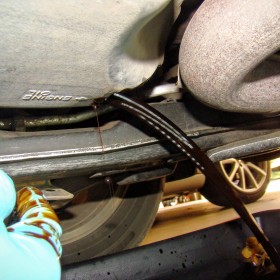
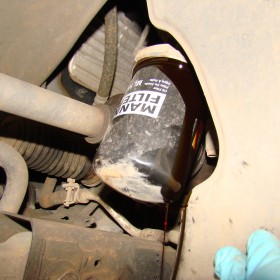
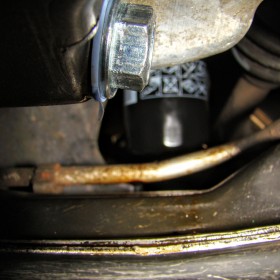
When most of the oil is drained and it has slowed down to a drip I then remove the old oil filter. This is one of the benefits of the rectangle shaped oil pan, I can usually place it underneath where the oil is still dripping and the filter at the same time. There is a plastic fender shield in front of the oil filter on the passenger side, you can pull that back out-of-the-way to get to the oil filter.
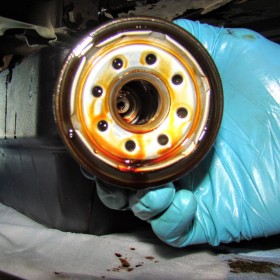
The Honda Ridgeline filter is small enough that it is easy for me to get my hand around and untwist it without a tool. Most other cars that I change oil on I have to use a tool to get the old filter off. Once the filter is loose I slowly unscrew it and until it is completely off and then turn it upside down in the oil pan to drain.
Oil usually gets on the frame during this process so now is the time to get some shop towels and clean up that mess and use a clean shop towel to clean up around the oil filter housing.
After you have everything cleaned up now you’ll want to take your new filter and put some fresh oil around the o-ring on it. Then you’ll put it on and hand tighten it, once the o-ring comes in contact with the oil filter base you only need to go about 3/4 of a turn more. There is no need to put the filter on as tight as you possibly can. I usually just look at an identifying mark on the filter then guess when it’s about 75% of the way back around to that point and call it good.
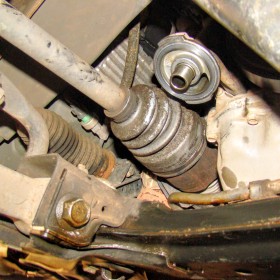
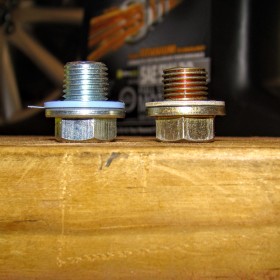
Once the new filter is in place you can then install the oil drain plug. Until recently I’ve never replaced the oil drain plug but now it is something that I do every other oil change or so just for good measure. With these Dorman plugs that I bought I’ll likely replace the washer every time since it is not metal. I’m not real sure there is any reason to really replace anything but the washer but I suppose the actual plug could wear out over time. I used the 17mm socket and torque wrench and put the new plug on with about 18 ft-lbs.

The only thing left to do now is refill the oil. This vehicle takes about 4.5 quarts of oil with a filter change so I put in a little over 4 quarts and then start the engine for a few seconds to let the oil flow into the filter. I also back the truck off of the ramps/boards at this time to get it on a level surface. I then wait a few minutes to let the oil settle down and check to see how much I need to add. I always leave it a little less than full since I know there is usually 1/4 quart or so difference once the oil settles completely. That is to say if I leave it a little low and wait a few hours to check it the level will likely be just about right. It’s always better to have a little less oil than you need in there than too much since you can easily add more if needed.
The only thing left at this point is to make a note of the mileage on your vehicle when you changed the oil so you’ll have an idea of when to do it again. You can reset the “Oil Life” indicator by scrolling to that screen with the key on and holding down the reset button until it asks you if you are sure you want to reset it.
It’s also important to note that I always dispose of my used oil and rags by taking them to any one of the many local places that offer free recycling; Autozone, Wal-Mart, O’Reilly’s, etc.
2 Comments
Jason, I’d like to know which brand and size of torque wrench you used on the Honda Ridgeline oil change. I have two Craftsman torque wrenches and neither fit. Thanks.
Hi Bob, thank you for your feedback, it appears something happened to the links to the tools I used, I will get that fixed but here is a link to the torque wrench that I used, I hope this helps.
TEKTON 24330 3/8-Inch Drive Click Torque Wrench (10-80 ft.-lb./13.6-108.5 Nm)
http://amzn.to/2g9A7dH